Tuesday, June 17, 2014

Recreating a Moment

When Leah came home with us in August 2010, I set her on our bed and quickly composed a photo. I was relatively new to photography and inexperienced with my camera, but it turned out to be one of my favorites.

Leah, 8/14/10 (age: 3 days)


Fast forward nearly four years.

Last week we came home with Gabe, and one item on my to-do list was to recreate the same photo. Nothing too fancy, but I'm a little more comfortable with getting good image quality and tone curves, so I'm quite happy with the results.

Gabe, 6/12/14 (age: 3 days)


Sunday, May 05, 2013

The Art of the Science of the Art of Taking Photos of Kids

Got to run around with friends and kids this weekend, and played with a certain Mr. F's new Nikon (it's dreamy!). And if you get the Mr. F reference, you are also excited about May 26. Anyway, I'm feeling the inspiration for a post.

Question


How do you take good photos of kids?
--Stock answer: blah blah blah blah blah
--My answer: Psychology. Tactics. Manipulation.

Let's take a step back - what makes a good photo?
(1) Technically solid (focus, exposure, whatnot)
(2) Follows principles (framing, rule of thirds, etc)
(3) Artsy stuff (tells a story, interesting subject, visually neat)

After hummingbirds, meteorites and dark matter, kids have to be the most difficult subject to meet all three criteria:
--They are always moving...away from you
--They are really short and unpredictable
--They really don't care about the aesthetics of your photography

Not following me? Here are a few illustrations from a fabulous (crappy) blog. For context, Leah is somewhere between blurry stage and performer stage, and fortunately her signature smile is nothing like the one my brother Luke wore from ages 3-14.

On the flip side, if what you want is the product of kneeling down and following the action as best you can, congratulations - the camera's memory card overfloweth with such gifts:

I've got more of these than Favre has interceptions


#1 The Snare


Say you are in the yard with your little darling. The sun is nice, her face is relatively clean, she's wearing something you are willing to show to others. It's a photo op. If you just pull out the camera and start shooting, odds are you'll get a bunch of photos that are a whole bunch of nothing special.

Shoot wide open? Good luck focusing. Take a deeper Dof? Now there's blur. Use a high ISO? You've gotta crop so much that the grain kills the shot. Want to see her face? Too bad, she's not looking at you. Whatcha gonna do?

Lots.

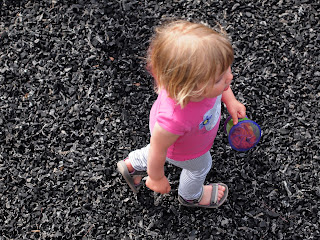
You know your child. You know what  she'll respond to. You know what bait to put in the snare. 
--Pick a good place for a photo, assuming your kid was standing there, then get your camera set.
--Maybe throw a stick there and see if she'll play fetch
--Maybe have a race...but instead of racing you just wait for her to run through a the spot (she just wants to win, anyway)
--Have her go down a slide and just wait at the bottom. Each time you can get a few shots.

You'll get something like this. It doesn't even matter if she's playing the same game as you, so long as she hit her marks:

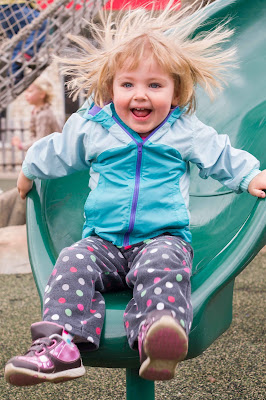
This was her 10th time down that slide
 
Dad: You go down first, I'm scared. Daughter:.So, Dad, you coming down yet?


Interestingly, these are two different parks on two different days. Would you say that she has a few favorite outfits?


#2 Go Hide


Another technique - tell her to hide behind a tree from you. You have no intention of going to find her, but you know that she has no patience and will soon peek around to look if you are coming. Actually, it can be anything. A subject will frame herself very nicely by peeking around an object, and it's a flexible enough technique to use almost anywhere.

You can make this photo:

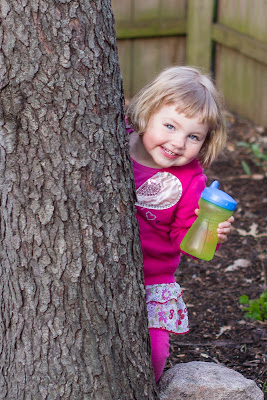
I can hide for at least 5 seconds.


#3 PBS is like GameGenie for Cameras


Indoor portraits? What do you think god invented PBS Kids programming for? Education? I can take 500 photos of her in the afternoon sun, as many angles as I like, and I can pretty much do anything so long as the Curious George is still on.

You can make images at F1.8, without cropping, at a low ISO!

ISO 200  45mm  F1.8  1/60 sec


#4 Passive Observer


This is the most elusive and most effective method - find a time when she's doing something that's got her engrossed...and is worth blogging about. Wait...that's not the goal? Whatever.

I try to keep the camera within a 5-sec sprint at all times, so when such an opportunity presents itself I have a fighting change to document the moment. In this case she had (a) agreed to have her hair made "fancy," and was (b) willingly brushing her teeth. The mirror made a fun frame for the shot.

This has never happened again.

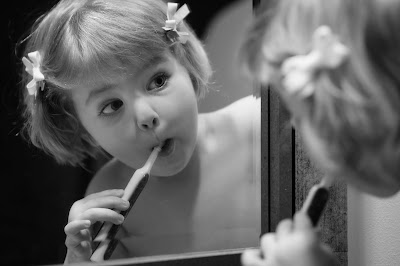
Proof for the dentist


 Easy Mode


Here's a little sample from the simple days of yore (and an older post) - photographing a sleeping baby. Super easy to compose, get the right exposure, choose your depth of field.

Composing this was as challenging as stealing candy from her


Of course, stress and sleep deprivation are questionable fuels for creativity. Want to know what it's like? Stay up all night doing something delicate and difficult that you have no idea how to do (e.g. disassemble/reassemble your DVD player), then as the sun rises take a stunning photo of your cat.

Thursday, April 04, 2013

Life on Mars

I had some time this morning to try a project - find interesting textures around my house and make abstract images from them. Easy enough, and I came in with little vision for what the final product would look like except that I wanted them to be unrecognizable from their original form.

If this works well, you won't have any idea what these things are, and I'll bet you a doughnut you can't guess but 1 or 2.

The fun part was that as I processed the photos, I found myself envisioning a lunar/Martian landscape - barren, rocky, cold, colorless...and a little weird. Maybe with an alien! Check these out and I hope you find them cool. Bonus points for guessing what they are in the comments.


Images from the Mars Rover?


Mountains of the Moon


A Martian Approaches!


Tenticles


Flying Objects


A Foreign Sky at Night


Thursday, March 14, 2013

Creative Bathing

I will not bore you by listing the antics that fill bath time in our home, but I will share some silly photos and allow you to infer what goofiness was going down. Okay, I lied - we were listening to the Barenaked Ladies kids album on my phone, singing along to Crazy ABCs.

Don't own it? You should. It's excellent.

Anyway, I took 72 photos during the bath, all with the 20mm (40mm equivalent), no flash, and no real tricks. Two photos stood out as keepers, and they also provided good material to try out some post-processing techniques I've been learning about.


Shampoo Buffant, a la Flock of Seagulls


Original Camera JPEG


ISO 400 20mm  F1.8  1/15sec


This was a moderately challenging photo
  • There was a lot of noise, especially since this is significantly cropped
  • The eyes were very dark, so I had to dodge nearly half a stop
  • The focus wasn't perfect, and combined with the noise I needed both of sharpening and luminance noise reduction
  • Not much dynamic range between the subject and background

My process
  1. Now that I'm more comfortable with the with how to fine tune sharpening I was pretty successful with this, though the eyes were a challenge to get right. 
  2. I selected the background (yay, auto-mask!) and burned it darker, the cut the clarity to blur it a bit more. 
  3. Finally I brightened the highlights a bit more (now only part of the subject), and this increased the contrast a bit.


Final Image


Bath Elf


The Laughing Game


I've got a great technique for getting shots like this - The Laughing Game.
  1. I say, "Count and then we'll both laugh as hard as we can."
  2. She counts to some arbitrary number, then starts laughing.
  3. While she's counting, I get the camera ready and then just hold down the shutter to take as many photos as you can (I can usually get 6-8 before she moves out of focus). Also, I laugh like a manic.

I am so smrt!

Original Camera JPEG


ISO 1000 20mm  F1.8  1/50sec


Again, this photo has similar challenges, and at a much higher ISO to boot.

I did most of the same things as the first image, though because Leah looked so ridiculous already I felt obliged to use more extreme modifications.

I added a new trick, too - editing the camera calibration setting for distortion, somewhat mimicking a fisheye lens. Looking at the final result you would probably guess that I had half the focal length.


Final Image


KABLAMAKUS


Also, I did one super duper smart thing this time - I used a neutral gray card to get my white balance correct!

Alex can be non-dumb, periodically

Saturday, February 09, 2013

Tickling the Ivories

Okay, "ticking the ivories" generally means "playing piano," but I got this wrong as an extra credit question back in 10th grade and since then been looking to get "brushing your teeth" as an accepted second meaning. Now it's on the internet. Boom.

Not too much to say here, as this image was neither premeditated nor does it exemplify anything other than framing the subject as best I could and taking lots of shots. Pretty simple Lightroom processing (a little dodging, cropping, vignetting, fixing some highlights).

I'm a sucker for black and white, but I'm including this as both color and b&w in case others feel differently (e.g. family members that are totally going to make this the background on their desktops).


ISO 200  45mm  F1.8  1/30 sec


The young starlet ticking the ivories


Brush your teeth.
--Alex

Sunday, January 27, 2013

Cat Painting

Cat + laser pointer + dark room + long exposure = blog post!!

Here is an image from my latest experiment. Shoulda switched to the longer lens earlier, as this is cropped a  bazillion %, and then the cats started fighting and that ended the session.


ISO 200  20mm  F4.0  2 sec


Here it is in monochrome. Very different, as the color is so distracting, and it makes me thing that I could do a lot with a laser pointer that would yield surprisingly non-bizarre results.


Wednesday, January 23, 2013

Sharp as a Bag of Wet Towels

Is there a term more widely, vaguely and euphemistically thrown around by photographers than "sharpness?" This lens is sharp. Every photo needs some sharpening. Sharp between F2.8 and F9. Tack sharp. In Lightroom 3 there are at least 7 sharpening-related settings I can think of off the top of my head, and if you ignore them all...you can make excellent photos.

What gives, yo? Why is this so important?

Many great things aren't sharp (hello, Monet?), and how is sharpening different from focus? I've been largely ignoring the settings in Lightroom for years, only using them when trying to recover a photo that's a touch out of focus or at a high ISO.

I've come to a conclusion - I need to read up on the principles of sharpening and figure out whether this is an elaborate hoax propagated by ignorance (e.g. tapping on the top of a soda can to reduce fizz), or actually a valuable part of my imaging tool belt. Hmm...how about digital-photography bandoleer? Yeah.

Mission

Take a couple photos that are already good and try to improve them significantly with the sharpness settings in Lightroom.


Overview of the Settings and Jargon


There are four basic sharpening settings in Lightroom 3 in the Detail window, grouped logically and more-or-less undefined unless you read a tutorial:

  • Amount - Slider that sets the "amount" of sharpness. The only obvious part of this. At 0 everything is blurry; at 100 everything is "posterized," which essentially means "fugly."
  • Radius - The distance from a strong edge, in pixels, that will be sharpened. 1 is the default and it seems generally ideal, but for fine things (e.g. grass) you might go smaller. I've yet to find a good example of why >1.5 is desirable. Best idea seems to be to leave this setting alone unless the image is of an extremely detailed/undetailed subject.
  • Detail -This affects the degree to which minor edges are excluded from sharpeneing, where 0 sharpens only major lines and 100 sharpens all shapes. Seems that the idea is to start low here and slowly increase the detail until there's enough definition in the details of the image.
  • Masking -Very fancy setting, as it sets a threshold on the image where only relatively stronger edges are sharpened. At 0 you sharpen everything, while at 100 only the edges of major shapes are sharpened.
Related settings include holding down ALT to get a preview of the tools (see links at the bottom for more info on this), and noise reduction, which reduces noise with some cost of detail (i.e. you should sharpen some to compensate).


Example 0 - How to ruin a photo


This is what happens if you "posterize" a photo with too much sharpening. Also, the subject is a moron.

This same moron over-sharpened himself in Lightroom

Don't do this.


Exercise 1 - Nice portrait, normal ISO. Fixing something that's not broken.


Here's a thoroughly adorable photo I took of Leah in the kitchen. You can't tell, but she's got a mouth full of banana.

Why am I sharpening this one? Well, it's supposed to be important. Let's see if I can improve on something that's essentially sharp as far as I can tell. And trying to improve things that are already non-broken is a bit of a family tradition, but historically there wasn't a CTRL-Z.

Note: By default, Lightroom does some sharpening, it's just not masked and at a fairly low level. I did some noise reduction to begin with as I'm cropped way in here.

Before


Default Lightroom sharpening (no masking)


After


Additional sharpening, including a mask set at 50

Seriously people, when I had a super-duper zoom on areas like her chin and eyes, I was making an improvement. I don't think anyone has looked that carefully at the Mona Lisa.

Verdict

Don't worry about sharpening if you don't have noise, detail or focus issues. Go pet a cat or make a sandwich.


Exercise 2 - Slightly out-of-focus, high ISO portrait


This is one of my all-time favorite photos - a 31-yr-old me with his 31-day-old daughter, credit to Meg for the camerawork.This is printed out on my desk at work, but I never felt I quite got it right and it's been sitting unchanged in my catalog for over 2 years. Here are my gripes:
  1. Leah's head is a little out of focus, which is unavoidable for F1.8
  2. The highlights on the faces were lost due to the high dynamic range. Though somewhat recovered it leaves the edges of the faces a bit soft.
  3. Adding sharpness added noise, and reducing noise reduced sharpness. It's hard to find the best combo.

Before


Default Lightroom sharpening


After


The best I could do to get this sharper

Try to ignore the edges, as they stayed about as sharp as I could get as I applied the mask. Where I made the most improvement was in reducing noise in other areas, such as around the mouth. In short, applying a mask lets you get things a little sharper, but mostly protects the rest of the image from being ruined.

Verdict

Sharpening doesn't do as much as you would think, or at least Lightroom does a really good job without you needing to take the yoke from the autopilot. You are more likely to be able to limit the bad parts of sharpening than get make significant improvements.


Conclusion


After all this putzing around with sharpening I'm left thinking that Lightroom is doing pretty darm well in this dept without my making any changes. Not to say that I won't mess with sharpening on occasion, but it's unlikely that I'll be able to save a terrible photo or make changes to a keeper that someone would notice consciously.

I believe that the digital photo gurus out there know what they are talking about, so I'll keep experimenting with other types of images (landscapes?) to see if there are more places where the sharpening controls will make a difference.

Credits

I read the following webpages as part of this process. Citing sources like a champ.
ISHOOTSHOWS.com
PHOTOGRAPHYLIFE.com
Digital Photography School
ePHOTOzine