Sunday, January 27, 2013

Cat Painting

Cat + laser pointer + dark room + long exposure = blog post!!

Here is an image from my latest experiment. Shoulda switched to the longer lens earlier, as this is cropped a  bazillion %, and then the cats started fighting and that ended the session.


ISO 200  20mm  F4.0  2 sec


Here it is in monochrome. Very different, as the color is so distracting, and it makes me thing that I could do a lot with a laser pointer that would yield surprisingly non-bizarre results.


Wednesday, January 23, 2013

Sharp as a Bag of Wet Towels

Is there a term more widely, vaguely and euphemistically thrown around by photographers than "sharpness?" This lens is sharp. Every photo needs some sharpening. Sharp between F2.8 and F9. Tack sharp. In Lightroom 3 there are at least 7 sharpening-related settings I can think of off the top of my head, and if you ignore them all...you can make excellent photos.

What gives, yo? Why is this so important?

Many great things aren't sharp (hello, Monet?), and how is sharpening different from focus? I've been largely ignoring the settings in Lightroom for years, only using them when trying to recover a photo that's a touch out of focus or at a high ISO.

I've come to a conclusion - I need to read up on the principles of sharpening and figure out whether this is an elaborate hoax propagated by ignorance (e.g. tapping on the top of a soda can to reduce fizz), or actually a valuable part of my imaging tool belt. Hmm...how about digital-photography bandoleer? Yeah.

Mission

Take a couple photos that are already good and try to improve them significantly with the sharpness settings in Lightroom.


Overview of the Settings and Jargon


There are four basic sharpening settings in Lightroom 3 in the Detail window, grouped logically and more-or-less undefined unless you read a tutorial:

  • Amount - Slider that sets the "amount" of sharpness. The only obvious part of this. At 0 everything is blurry; at 100 everything is "posterized," which essentially means "fugly."
  • Radius - The distance from a strong edge, in pixels, that will be sharpened. 1 is the default and it seems generally ideal, but for fine things (e.g. grass) you might go smaller. I've yet to find a good example of why >1.5 is desirable. Best idea seems to be to leave this setting alone unless the image is of an extremely detailed/undetailed subject.
  • Detail -This affects the degree to which minor edges are excluded from sharpeneing, where 0 sharpens only major lines and 100 sharpens all shapes. Seems that the idea is to start low here and slowly increase the detail until there's enough definition in the details of the image.
  • Masking -Very fancy setting, as it sets a threshold on the image where only relatively stronger edges are sharpened. At 0 you sharpen everything, while at 100 only the edges of major shapes are sharpened.
Related settings include holding down ALT to get a preview of the tools (see links at the bottom for more info on this), and noise reduction, which reduces noise with some cost of detail (i.e. you should sharpen some to compensate).


Example 0 - How to ruin a photo


This is what happens if you "posterize" a photo with too much sharpening. Also, the subject is a moron.

This same moron over-sharpened himself in Lightroom

Don't do this.


Exercise 1 - Nice portrait, normal ISO. Fixing something that's not broken.


Here's a thoroughly adorable photo I took of Leah in the kitchen. You can't tell, but she's got a mouth full of banana.

Why am I sharpening this one? Well, it's supposed to be important. Let's see if I can improve on something that's essentially sharp as far as I can tell. And trying to improve things that are already non-broken is a bit of a family tradition, but historically there wasn't a CTRL-Z.

Note: By default, Lightroom does some sharpening, it's just not masked and at a fairly low level. I did some noise reduction to begin with as I'm cropped way in here.

Before


Default Lightroom sharpening (no masking)


After


Additional sharpening, including a mask set at 50

Seriously people, when I had a super-duper zoom on areas like her chin and eyes, I was making an improvement. I don't think anyone has looked that carefully at the Mona Lisa.

Verdict

Don't worry about sharpening if you don't have noise, detail or focus issues. Go pet a cat or make a sandwich.


Exercise 2 - Slightly out-of-focus, high ISO portrait


This is one of my all-time favorite photos - a 31-yr-old me with his 31-day-old daughter, credit to Meg for the camerawork.This is printed out on my desk at work, but I never felt I quite got it right and it's been sitting unchanged in my catalog for over 2 years. Here are my gripes:
  1. Leah's head is a little out of focus, which is unavoidable for F1.8
  2. The highlights on the faces were lost due to the high dynamic range. Though somewhat recovered it leaves the edges of the faces a bit soft.
  3. Adding sharpness added noise, and reducing noise reduced sharpness. It's hard to find the best combo.

Before


Default Lightroom sharpening


After


The best I could do to get this sharper

Try to ignore the edges, as they stayed about as sharp as I could get as I applied the mask. Where I made the most improvement was in reducing noise in other areas, such as around the mouth. In short, applying a mask lets you get things a little sharper, but mostly protects the rest of the image from being ruined.

Verdict

Sharpening doesn't do as much as you would think, or at least Lightroom does a really good job without you needing to take the yoke from the autopilot. You are more likely to be able to limit the bad parts of sharpening than get make significant improvements.


Conclusion


After all this putzing around with sharpening I'm left thinking that Lightroom is doing pretty darm well in this dept without my making any changes. Not to say that I won't mess with sharpening on occasion, but it's unlikely that I'll be able to save a terrible photo or make changes to a keeper that someone would notice consciously.

I believe that the digital photo gurus out there know what they are talking about, so I'll keep experimenting with other types of images (landscapes?) to see if there are more places where the sharpening controls will make a difference.

Credits

I read the following webpages as part of this process. Citing sources like a champ.
ISHOOTSHOWS.com
PHOTOGRAPHYLIFE.com
Digital Photography School
ePHOTOzine

Friday, January 18, 2013

Lens vs Lens

Because my life is perfect, I was gifted a Olympus 45mm F1.8 lens for xmas. Meg rocks.

Now I have a dilemma - I have two fast prime lenses, as 20mm and 45mm, but which do I leave on the camera for all those household snapshots that won't wait for a lens change?
  • These are multiplied by factor of 2.0 for a 4/3 sensor, equating to a 40mm and 90mm focal lengths. In other words, a classic slight wide-angle lens and a classic portrait lens. In short, both are perfectly functional for taking pictures of living things inside your home, but they have very different behaviors.

Today I just happen to find myself with an unscheduled few hours an home (the muchkin had to come home from daycare due to a fever and is currently zonked), so I decided to do a short series of test photos. I promise I'll finish my homework later.


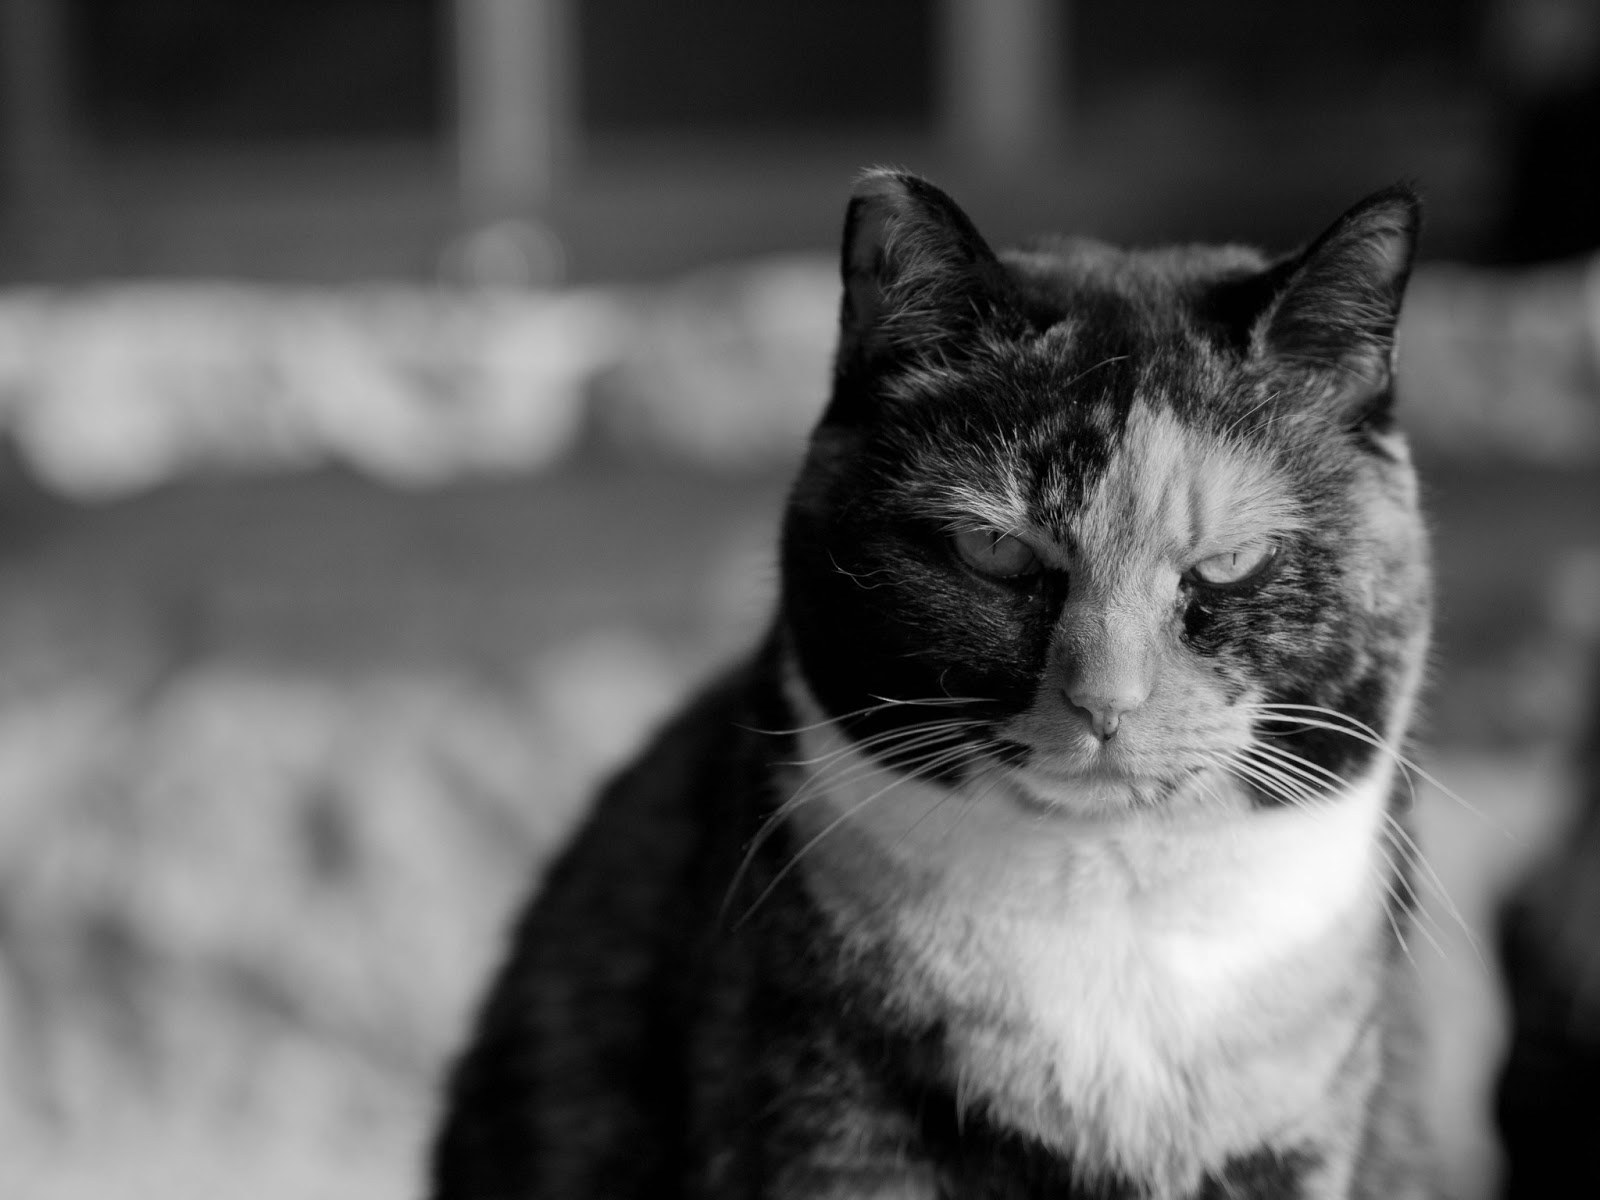
Test Subject - Nola the Cat, aka The Plush Statue


Why she's perfect for studio tests:
--Doesn't move, except to relocate to whichever place in the house has the best photographic lighting
--Great detail and dynamic range
--Couldn't care less whether her picture is shared on the interwebs
--A suitable proxy for the relatively less-static things I photograph (the other cat, the kid, plants)

Note: These images were taken at F1.8, so the difference you see are mostly due to the difference in lenses. I did a bit of post-processing to get the exposures as close as possible, including recovering some highlights. My blog, my rules.

Test Series #1 - Closeup


45mm


20mm

This first shot is more of a classic portrait, and the 45mm is...a portrait lens. I think it wins out because of the huge difference in depth of field and subject isolation. With the 20 you inevitably get a more cluttered frame. Nola's face is nearly identical in each, and pleasantly sharp and undistorted (and furry).


Test Series #2 - Body Shot


45mm

20mm

The change here is subtle as I frame her whole body, and while the same things are true as before (DOF, cluttered frame), I think the 20mm facilitates a slightly more interesting photo. Here's why: the height of the camera relative to the subject. The first image is straight on, even with eye level. The second is just a bit below her eyes, which I prefer.

When you take a photo of a person, being above or below them has a huge impact on the feel of the image. How many lousy images have you seen of kids taken from a parent's eye level? By getting below a cat you see her the way you see another adult human, and it's a more pleasing picture. You can't take a from-below, full-body photo of a cat with a 90mm focal length without putting her on top of a bookshelf, but at a 40mm focal length you can lie on the floor and take the shot.

Beyond this, as I took photos with the 20mm I naturally made all sorts of different angles - above, below, on the side. Rotation is easy when the radius around your subject is short (a 1-2 feet vs 5-10 feet).


Conclusion


45mm

--Generally impossible to get below the subject, especially for cats and kids
--Better subject isolation - short dept of field and more control over framing
--More accurate metering, as the frame can more easily be kept clear of bright light and dark shadows
--Not much flexibility in positioning, as often you have to stand in a different room or on top of furniture to get the distance right


20mm

--Easier to frame above or below the subject, especially for cats and kids
--Facilitates rotation around a subject, almost inadvertently taking a wider variety of angles and frames
--Option to take a photo of the whole scene, not just the subject


So the best lens is both of them, depending. Still, this exercise helped me see what types of photos I can make with a lens and why a specific shot would be better done with one or another. And I got to play with my camera during a weekday afternoon :)